Sunday, August 31, 2008

Bubur Ayam / Chicken Congee


Of course I do miss Indonesian food, but I have long letting go of that sudden cravings. One, I enjoy fixing it up in my own kitchen. Two, I stock up enough instant gratification quick snacks (i.e. shrimp crackers, frozen Asian style meat/fishballs, frozen red bean popsicle, etc.) Three, there are gazillion different food here for me to try - I am too busy thinking about which new place to hit. Vik and I are attempting to try every single restaurant on 5 block radius. And see how long it'll take us to do so.

Howeeverrr, Vik is oddly different. He thinks about Indonesian food more than I do! He describes the food to our friends in a way that I could not muster. Still talking about how we spent full two weeks in my hometown and barely ate similar type of food nor went to one place twice. 14 days, 42 meals, hm..and about 60 snacks in between, heehee. If I remember correctly, there were only two places (his favorites) where we ended up twice.

So few nights ago as weather was a little bit chilly/rainy over the afternoon, he says 'Don't you think it'll be soooo nice if we have bubur ayam for dinner tonight? It'll be such comforting dish after golf in this cool weather.' Been together for almost 7 years, married for 3. Not extravagantly long, but long enough that I know what he is trying to say:.

1. You don't mind I go for 18 holes, do you? - No, I don't mind, we both deserve some break after crazy work hours and the fact that this long weekend is just going to be loaded with work. 2. Can you fix me bubur ayam? - now, truth is I sort of sworn off congee. That's mostly what I ate for a full 3 months at one point of life. But then, of course Vik went to long description of this one bubur ayam he had - more of Indonesian style, with sweet soy, soy bean nuts. Ah, suddenly I craved for it too!! See, he just has this crazy skill in describing food, while he does not even cook!

So anyway, I happily fix up a pot of bubur ayam. There are all type of bubur out there. I can't even begin to describe it. The most that I am familiar with are either Chinese style (from cracking raw egg to the bottom of the bowl, piping hot congee poured on top of it, or eat with salted duck eggs (yum!!) to fish congee) or Indonesian style (most likely involved sweet soy, shredded chicken, krupuk, and sometimes, little spiced broth on top of this rice concoction). In my opinion, there is no right or wrong way of cooking/eating congee. In some version, soft rice grain still visible. Other version, it is just like creamy soup. Thick or thin. Hence, the rice vs water ratio is varied. But, let's just say, you can always thin it out, by adding more water/broth, but once it's too thin, it's almost impossible to thicken it (unless you leave it outside to harden up..eww.).

What:
- 1/2 cup of rice
- 5 cup water/ broth (I have always prefered adding low sodium broth)
- 3 inches of ginger, cut to 2, whacked
- 4 cloves of garlic, grated (or whacked is fine too)
- tiny bit of oil
- 1 tsp of salt
- 3 chicken thighs (with bone - this is a perfect dish to toss in any reserved chicken wing tips, or any bones)

How:
- Heat 1 tsp of oil in a pot. Toss in ginger and garlic. Lightly fry.
- Toss in chicken pieces (I like to sear it for a while). Toss in rice.
- Pour water/broth. Stir. Cover with lid.
- Check pot once a while to stir and making sure it gets to the consistency of personal liking.
- Lift chicken pieces after about 20 minutes (depending on size of chicken pieces). Transfter to plate/ chopping board. Shred.
- At this point, it's absolutely fine to simply toss back shredded chicken to porridge. And just serve/eat it as is. It can be doctored up with sweet soy with sprinkle of crisy shallots - Indo style. Or, drizzle with soy and sesame oil - which bring it to somewhat of Chinese style. The flavor and smell of this congee is just super comforting!

However, we are taking it up a notch by this ingredients:
- handful of unsalted soy bean nuts
- 3 shallots, finely chopped
- shredded chicken
- sweet soy sauce
- salty soy sauce
- sambal oelek (optional)
- 2 green onions, chopped (save some for garnish)

How:
- Heat 1 tbsp oil in pan, toss in shallots and shredded chicken.
- Toss in green onions, and both sweet and salty soy sauce to mixture. Stir for few minutes.
- I like to add the soy bean nuts to the pan too (but it can also be added on its own, just before serving). Stir and fry together with shredded chicken for a little while.
- Serve by scooping up congee to a bowl, top with some chicken mixture, drizzle some more sweet soy sauce, and salty soy (optional), sambal oelek, and garnish with green onions.

Taking up two notches by adding cakwe/yao ja gwai/ you tiao/ Chinese fried dough (crullers) on top of porridge. Don't have any of those though. Just wishful thinking. Maybe I should try to make some. Maybe not.

Thursday, August 28, 2008

'Pan-Fried' Chicken Satay/ Sate Ayam Kecap

I made satay/sate with peanut sauce for the Independence day - still not post an entry about it yet and kinda promised the sauce recipe to few people, but well..too bad.., it's too long of a recipe. But will get to it.

Anyway, THAT combination was as real deal as I could get for satay and peanut sauce; except that I did not grill it on charcoal neither using bamboo weaved hand-fan to distribute the coals' heat. There are always shortcuts (like, using peanut butter) but I wanted to make it as authentic as possible, so it was all hard labor, grinding peanuts and all! That is then, story for another day, today is different story. I still have 10 satay skewers in my drawer. I used up 40 that weekend. Suppose I can just leave the skewers in the drawer, but no, I can't. I may have certain type of disorder. I can't stand '2 tbsp of chopped pecan', or '1 cup of rolled oats' just sitting there type of person. If it's basic, staple sort of ingredients, as in, sugar, salt, it's fine. Otherwise, I gotta use it and I will find a recipe that require exactly that amount.

So, these 10 skewers. Hm..I can cut them up and use it as toothpick. I can use them as 'craft' materials. Then I see a half cut tomato I used for lunch. Heh. Mix it with sweet soy sauce, chillies and shallots. Perfect for another satay dish, however, not the trouble. For 10 satay - it has to be Painless, with capital P! So 'panfrying' on high heat is the way to go. And it's perfect with Sayur Asam. Both combined, from prep to serve, less than 1 hour.

What:
satays:
- chicken pieces
- soy sauce
- sweet soy sauce (do not go overboard, or satay will burn too quickly on the pan)
- pinch of turmeric
- pinch of coriander
- more than a pinch of chillies powder
- pepper

sauce:
- sweet soy sauce (now, you can pour as much as your heart desire, in my case, for 10 satays, 1/2 a cup!)
- 4 shallots, chopped to thin rings
- 1/2 large sized tomatoes, coarsely chopped
- 6 red chillies, coarsely chopped
- juice of 1 lime/lemon (ideally lime, but only have lemon on hand, so..lemon it is)

How:
- Toss all the spices with chicken and let it marinate for about 20-30 minutes.
- Mix all sauce ingredients and lightly mash them, to infuse all the flavor together.
- Skewer chicken to sticks.
- Heat a touch of oil/butter on non stick pan. Heat has to be on medium-high. Place chicken skewers on pan.
- Once one side is browned, flip chicken to other side. Turn the heat down to medium and put the lid on for a minute, to ensure chicken is cooked throughout.
- Lift the lid and turn heat back up to high, just long enough to 'char' the other side.
- Serve with the sauce poured on top of satay.
Note: Don't overcrowd the pan, or juice from chicken will start a 'steaming' process instead of 'faking' a grilling process.

edited** 08/29/08 A friend says 'So, what do I do with the sauce?' - Heehee. :) FYI, he is just as Indonesian as I am, but felt the need of pointing out a flaw. Lucky that we grew up together so I let him be!! :P So, I added the last line of 'how'

Sayur Asam/ Tamarind Based Vegetable

Every Sunday, I write down a possible menu for the coming week. Back in the days when I had to be at work M-F, 8-5 kinda hours, I stick to the list 80% of the time. Oh wait, it was also days when there weren't many 'food related' eye-candies along the way from work/gym/et cetera to home. And it'd involve me going back to the car, drive to grocery store - if I were to spring out random menu everyday.

Since we moved up here, life (at least, eating life) changes. Fresh produces, farmers market, butcher, all these local stores lining up around neighborhood. I still write up weekly menu, it helps me to stay organize, but it's going on 50% rate nowadays. There is always something catching my eyes, whatever that is, spices, produce, herbs, and I'd just pick them up and figure out what to do with it.

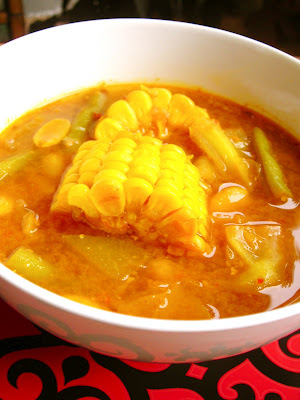
Corn is everywhere..EVERYWHERE!! I don't really like corn as is. I like it when it's mixed to something else. So, I grab 8 ears for $2. Not sure what I am gonna do with it. Corn muffin, corn salsa, corn pancake, corn soup....So anyway, here goes tamarind based vegetable soup/ stew. It's somewhere between soup, stew, or simply 'vegetable dish'?! Sayur Asam, which word to word translation will make it to 'Tart/Sour Vegetable' - the title doesn't do justice to the dish.

It's slightly sweet, tangy, spicy and hot (optional, but anything we eat usually involve heat) :) Very refreshing type of dish. It's very traditional. Very homey and basic. Amount/ variety of vegetables should be whatever suits personal liking. The only thing that I wish I could find is melinjo/belinjo - have been on the hunt for these, but haven't come across it yet.

What:
- 1 corn cut to 1 - 1 1/2" thick
- 1 small chayote, cut
- handful of long beans, cut to 1 1/2" long
- handful of cabbage, cut to chunks
- 1/2 cup of raw peanuts
- 1 bay leaf
- 1 stalk lemongrass, whacked
- 2 1/2 cups water (I use boxed vegetable broth, but water is completely fine)
- 1 tbsp tamarind paste, dissolved in 2 tbsp of warm water

Grind to paste:
- 3-4 candlenuts
- 2-5 red chillies (depending on personal taste or tolerance to heat)
- 5 shallots
- 3 cloves garlic
- 2 tsp salt
- 1 tsp shrimp paste (optional, and I have been told that if it comes to it, one can use few dash of fish sauce as substitute. They both stink :D Never tried it yet though)

How:
- Heat 1 tbsp of oil in the pot. Toss in spice paste, fry for a minute or two. Add in lemongrass stalk, bay leaf and tamarind water. Let it come to quick boil.
- Pour in water/broth. Let it come to boil. Toss in all vegetables. Turn heat to low-medium.
- Cover and let it cook for about 40 minutes.

Tuesday, August 26, 2008

Coffee Chocolate Chips Biscotti

Fiddling in the kitchen (for exception of doing dishes! 'gaargh..) has always been some sort of therapeutic thing for me. Oh, how much I just love chopping, slicing, mincing and so on. The most expensive item I have in my kitchen is well..my knife (knives). Not pots and pans, as what I assume most people would think. And absolutely not gadgets; not much of gadget person and above all, if I can fit ONE gadget in my tiny kitchen, it'd be KitchenAid mixer. Anyhoo, in many occasion when I have to cook at somebody else' kitchen, I don't mind using their pots/pans/chopping block/spatula/colander and what not, but I will always always bring my knife. My choice of weapon, yeah? As long as I come armed with my cleaver. I hope this obsession does not at all imply a seriously 'distubed' personality hidden somewhere in me. :)

So this morning, halfway through some paperwork, I just needed to get away for few minutes. The leisure of having a job that entitles me to work anywhere, which today happens to be at home, is that I could sneak in to my therapy session!!! And where did the biscotti idea come from? The back of calendar from Sobey's (grocery store). I don't even shop there that much, but the neighborhood stores I frequent don't give away free calendar, ya know? :)

I was looking up some dates, then absent mindedly read this very recipe and 45 minutes later, a batch of biscotti. When thinking of biscotti, I always relate it to almond; don't have any almonds on hand, however, I have some amaretti cookies, so I crushed them up and added it to the mixture. It smells heavenly!

What:
- 2 3/4 all purpose flour
- 1 tbsp baking powder
- 1 tsp cinnamon
- 1/4 cup instant coffee (Sobey's puts Nescafe Rich Instant Coffee, but I use our personal favorite, Sumatra Coffee)
- 1/2 cup butter, melted
- 1 1/3 cup sugar (I use 1 cup sugar and 1/3 cup crushed amaretti cookies)
- 3 eggs
- 1 cup semisweet chocolate chips

How:
- Whisk together flour, baking powder and cinnamon.
- Whisk together coffee with 2 tbsp hot water until dissolved. Whisk in butter, sugar, then eggs until combined.
- Stir coffee mixture to flour mixture until just combined. Stir in chocolate chips.
- Halve dough. With spatula, shape one half into a log, measuring 12" long and 3" wide. Do the same with second log. Place logs 3 inches apart.
- Bake in center of 350°F oven for 20 to 25 minutes until just firm. Let cool on pan on rack for 10 minutes.
- Transfer to cutting board. With serrated knife, cut into 1/2" thick slices. Stand slices upright spaced apart on 2 baking sheets. Bake in 325°F oven for 15 to 20 minutes, until sides are no longer springy to the touch. Let cool on pans on rack.

Monday, August 25, 2008

Chipotle Smoked-Cheddar Burger


Work has been somewhat brutal lately. We both have been putting in 15 hours/day load, though long weekend is on horizon - it's a slim chance we'll be spending it by doing nothing. Sometimes, it makes me wonder on how we easily survived college life - 15-19 credits, held a job or two (three in Vik's case), and still had the energy for partying. Now, 15 hours/day for few weeks and our bodies felt so abused! Is this somewhat sign of old-age?!!!

So, I am taking a day off. Half day off, since I did have to do some work related errands in the morning. Vik too decided to free up some afternoon hours so we can just chill and relax. So on my way back home, I thought to fix up some fancy-nice dinner and we'll eat it out on the balcony. Well..it did not go as planned. Some unforeseen work glitches came up and what fancy-nice dinner?! :) So, something 'equally' nice but not necessarily fancy. Juicy burger with chipotle - adobo sauce and smoked cheddar, along with sweet potato baked fries. With cooling yogurt topping, to balance out spicy chipotle. And, creme caramel as dessert.

What:
Patties:
- 3/4 lbs of ground beef
- 2 chipotle in adobo sauce, chopped coarsely
- 1 tsp of the adobo sauce
- smoked cheddar, cut to itsy bitsy cubes
- 2 cloves garlic, grated/ finely minced
- 2 tsp of coarsely chopped red onions
- salt and pepper

Saucy toppings:
- 5 shallots, cut rather thickly
- 1 tbsp olive oil
- 2-3 tbsp yogurt
- 1 tsp honey
- 1 tsp hot sauce

How:
- Fry up shallots with olive oil until soft and caramelized. Let cool.
- Whip yogurt, honey, hot sauce in small bowl and toss in cooled shallots. This can be made bit in advance and store in fridge.
- Mix all patties ingredients, don't overwork the mixture. Shape to patties, size depends on personal taste.
- Slide to oven under broiler for about 12 minutes.
Note: yogurt can be substitute with mayo, of course. But I find chilled yogurt make a great combination with piping hot spicy burger.

The sweet potato fries is pretty easy. Just cut it up after peeling. Make sure they are dry (pat dry with paper towel), toss lightly with olive oil. Slide to the oven on 450F for about 20 minutes. Sprinkle with pepper and salt once out from oven. Some cajun spices or sweet paprika will also work superbly. Thought about it halfway munching them. A burger joint near our place has quite good spicy sweet potato fries with their burgers - hm...half a plate too late.

Croquette/ Kroket

Many variations of croquette across the board. Just in our household alone, we are accustomed with three different ones. According to granny, these croquettes, and many other snack goodies were brought/ introduced to Indonesia during the ruling of the Dutch colonial. Grandmas, of both sides have all these hand written cookbooks (all of which my mom keep and eventually will be mine!!!) , yellowed and brittled, half of them have titles that neither Indonesian nor English. Some funny ingredients that I believe will need extra hunting trip to speciality store. One of these days, I will.

As far as my knowledge, this style of kroket (that I like most) is pretty similar to bitterballen, just different shapes, one is shaped like small balls, the other one is cylinder. It's roux based with minced meat. Deep fried (yummmm!!) and we usually eat these by dunking it to hot sauce. But in reality what savory snack is there that we don't dunk into or slather with hot sauce? Er..almost everything!! :)

What:
- 100 gr flour
- 250 gr combination of chicken and shrimp (we have always used the combination of two, but it's not mandatory, all chicken is fine)
- 2 carrots, very finely shredded
- 75 gr unsalted butter
- 200 ml milk
- 1 egg (separate the yolk and white)
- 6 shallots, slice super thinly
- 2 green onions, finely chopped
- pinch of nutmeg
- salt and pepper

How:
- Heat butter in wok, toss in shallots and fry until soft. Note: It is 'lots' of butter (Paula Deen would just love it), but with it being roux based, well..butter it is.
- Toss in ground chicken and shrimps, stir and slightly 'mashed' with wooden spoon to prevent lumping. Toss in carrots, green onions, nutmeg, salt and pepper. Stir and mix thoroughly.
- Pour in milk and let it comes to boil. Then, scoop in flour gradually. Turn the heat to low. Cook for few minutes. Turn off the heat and let cool.
- Once batter/ dough is cool to touch, mix in the 1 egg yolk. Stir thoroughly.
- Form dough to oblong shape. First, dip to eggwhite and then roll to breadcrumbs. Then deepfry them until golden brown.
Note: this snack can be made few days ahead, keep in fridge and just reheat in conventional oven/ toaster oven.

Thursday, August 21, 2008

Risoles/ Risole

Instead of frying these risoles, I bake them. Personally, I like it best all fried and crispy. However, being the last item I made for the weekend Independence Day dinner and after frying batches of croquette and corn fritters, I have enough of it. Enough of the hot oil and the lingering fume of it. And also, I'd feel a little bit bad to eat all these fried foods.

I was not very certain about baking them. This is my very first time baking risoles! Doesn't sound very 'right', does it - baked risoles??! But anyway, I did. It's crispy, but man..the fried version is still better!!

Measurement of the filling/stuffing is pretty much up to the person who makes it. :) Just eye-ball everything. It also can be made vegetarian.

What:
Filling:
- 1 1/2 cups long beans, chopped
- 2 cups carrots, small cubed
- 1 1/2 cup cooked shredded chicken (optional)
- 4 shallots, minced
- 2 garlic cloves, minced
- pinch of nutmeg
- 1/2 block of chicken bouillon mix with 1/4 cup warm water
- 1 tsp of cornstarch, mixed with water
- salt and pepper

Crepe:
- 250 gram of all purpose flour
- 2 eggs
- 600 ml milk (I just use 2% milk, but my mom mix up water with powdered milk (Nestle), and if I may say, it gives a hint of sweet flavor, but I don't have a box of Nestle just sit around in my pantry)
- 60 ml melted butter
- pinch of salt

How:
- Make filling by frying up shallots and garlic. Then, just toss in chicken, green beans, carrots and nutmeg. Stir. Pour in chicken bouillon mixture. Salt and pepper. Cook until carrots are tender.
- Pour in corn starch mixture. Filling should be slightly sticky/damp.
- Make and assemble risoles just like the Pandan Crepe entry.
- Dip risoles to egg whites, roll on breadcrumbs. Bake in 400F preheated oven, until golden brown, about 20 minutes. Turn the rolls once halfway cooking. Or, better yet, fry them!

For spicy hot food eaters, slip in one or two thai bird eyes chillies at both end of rolls once fried. The way I like to eat it: take out the chili, take a bite of risoles, then a bite of chili. Or, my brothers would just start from one end that has chili/chillies on it. The heat should (it will) linger long enough til the last bite.

Wednesday, August 20, 2008

Lemper Ayam (Glutinous Rice with Chicken Floss)


Traditionally, lemper comes in banana leaves as wrappers, then grilled on open fire. The charred banana leaves lend this smoky flavor the the 'patties'. But nowadays, lots of places just wrap a sliver of banana leaves around it, less hassle. That said, I just semi wrap it with banana leaves band. Ugh..I feel silly for having to say this, but these leaves are just for show - decoration! Not intended for consumption. Things like this, escapes my mind and often, put our friends to the risk of 'chewing leafy' stuff. Good thing Vik has always been very good in reminding such things to our friends/guests, sometimes he also insists on signing consent form. ;)

The 'right' way of making the rice part is to steam it, then mixing it with boiling coconut milk, and steam it again until it's cooked. I find it a tad time consuming and plus the only steamer I have is just too small for this purpose. So, I just have been 'cooking' it like any rice cooking - no complaints so far.

What:
Rice part:
- 1/2 kg glutinous/ sticky rice, soak for about 1 hour.
- 350 cc coconut milk
- 1 stalk lemon grass, wacked
- pinch of salt
- pinch of sugar

Filling:
- 2 cooked chicken breast, shredded very finely (thus, the name 'floss')
- 1 tbsp ground coriander
- 2 tsp ground cumin
- 1 piece of galangal
- 3 shallots, chopped finely
- pinch of salt
- pinch of sugar (to taste)
- 1 stalk lemon grass, whacked
- 1 bay leaf
- 150 cc coconut milk
- banana leaves for wrapping (optional)

How:
- Cook soaked rice with low heat (do not need any extra water at this point), for about 20 minutes. It should be half cooked by then.
- Pour coconut milk into rice mixture. Turn up the heat a little bit and let it come to boil. Turn the heat back to medium low. Stir ocassionaly until rice soak up all the liquid.
- Cover and cook until it's done - about another 20 minutes.
- Grind coriander, cumin, galangal, shallots, sugar and salt to paste. Fry in little oil.
- Toss in chicken, bay leaf, lemon grass, coconut milk to pan. Stir and cook filling until it's only slightly damp.

There are many ways in shaping this dish. The 'best-professional' looking ones, and I believe the most used method in Indonesian kitchen is to use rectangular shape cookie cutter kind of mold. It was specially made for this, but basically a rectangular cookie cutter. Press 2 tbsp of rice to base of mold, pack it up, fill with 2 tsp of filling. Top with another 2 tbsp of rice. I only did this version..total of ...ONE time! I lost my cool by the third one. Too tedious.

Another way is to use big baking sheet/ pan, same idea, but just making bigger slab at once. Then cut it up to smaller rectangular. I use very slender baking pan/mold - 3x9x2. It's designed for stacked layered cake. But I found it perfect for this purpose too. Then, cut to 1.5x2 rectangular (after trimming the side). Dip knife to water between slicing/cutting to prevent stickiness. Oh, and also, when shaping/molding/patting rice mixture to pan, it helps to dip fingertips lightly to oil first, to prevent messy stickiness.

Some fancy places roll it up - sushi roll style. Come to think of it, probably the easiest method of all, huh? But it's just one of those things I insist to 'preserve', lemper should be rectangular. :)

Quick notes about photos: in up coming entries, there will be some that will have multiple unneccasary shots. Testing out some tips for taking better food photos. Love looking at good photographs - enjoy strolling to galleries that house photography stuff. A good audience, that I am. Completely helpless with camera and doubt that I will be anything great with it in near future - just like gardening. That said, I do want to take better food pictures. So, after some whining and all, a dear friend sent me three mock-up of 'mini studio.' Thank you, Magnus!! He tried to give me some pointers in words but my mind just draw a blank (45 degrees to where?!) Which is very oxymoron, considering that I make my living by imagining things. So, he sent me sketches/images!!!

Still not very comfortable yet, but I absolutely start to see how it can be.....extra frustrating!!! :) Nawh, getting there, getting there. Any easy tips are always welcome.

Vegetable Lasagna

Cleaning the fridge day happens when I can't stand all the randomness any more or simply have nothing better to do. With notepad in hand, I'd make notes on all these randoms stuff - 1 semi-wrinkled zucchini, 2 small tomatoes, etc etc. Things like that. Then hopefully come up with couple ideas for them - super nice if it does not involve a special trip to store to get extra ingredients kind of idea.

This afternoon, gather enough ingredients to whip up vegetarian lasagna. Actually enough to make a small pan for the two of us and 2 single servings - would be nice if I have rectangular pan, but got to do with round tins I have in pantry. Send the 2 single servings to our across the street neighbor. Yeap, I keep sending stuff that way, just so that I have 5 mile long tab on him and will get free help/ expertise when we move to our next abode. ;)

I have to post the tin version too, just because 1. it is cuter 2. melted cheese in larger portion does not look so appealing (dear husband says 'Look can be deceiving, and this is absolutely it') 3. trying different light source in taking photos

What:
- whole wheat lasagna, cook to al dente
- 2 tbsp butter/ olive oil
- 2 tbsp all purpose flour
- 1 cup of milk (more if you like more saucy type of filling)
- 2 cup ricotta cheese
- 1 zucchini, sliced thin lengthwise
- 1 small box of spinach, drained well
- 1/4 cup red onions, chopped coarsely
- 1/2 cup of olives, chopped coarsely
- 1 tomato, chopped coarsely
- 1 cup of mushrooms, chopped
- fresh basil leaves, tear to small pieces or chopped
- fresh parsley leaves, chopped
- pinch of garlic powder
- pinch of nutmeg
- pinch of oregano
- salt and pepper
- 1/2 cup part skim mozzarella cheese, shredded (optional)

How:
- Make quick roux by heating up butter/oil in pot. Sprinkle in flour, stir for a bit. Pour in milk. Whisk and break any lumps.
- Stir in chopped spinach, red onions and mushrooms. Cook for couple minutes.
- Toss in fresh herbs, nutmeg, garlic powder, salt pepper and oregano. Stir and let cook for few more minutes.
- Turn off heat. Stir in tomatoes, olives.
- Assemble lasagna by spreading very thin filling mixture on the bottom of the pan. Layer with lasagna sheets. Scoop 1/3 of spinach mixture on top of lasagna. Arrange zucchini slices on top of mixture. Then spread ricotta cheese on top of zucchini. Top again with lasagna sheets. Repeat for 3 layers. On the top layer, after spreading ricotta cheese, sprinkle with some part skim mozzarella cheese.
- Bake in 350 preheated oven for about 20 minutes, until top are golden brown.

Monday, August 18, 2008

Corn Fritters/ Perkedel Jagung

Oh, how do I even describe these fritters? I could eat the entire plate of it!! I had to alter the recipe a little from the original family recipe. In original recipe, there is no adding flour as thickening/binding agent. Just grated corn and spices. The taste and flavor of the corn just heavenly and very light in texture. To be able to do that, the recipe calls for older corn - hmm..does it even make sense? It's fresh corn, but not like being picked two days ago fresh. With drier kernels of aged/ older corn, the grated pulp binds better with other ingredients.

With summer young fresh corn, once grated, it gets so watery that I have to add rice flour to thicken it up to right texture. It is still delicious, just tad short of flavor and texture (denser, due to the flour.)

What:
- 4 corns, grate
- 4 shallots, cut paperthin
- 2 green onions, cut paperthin or chopped finely
- 1 medium size potato, boiled and mashed
- salt and pepper
- 1/4 cup of rice flour
- 1 eggs, lightly beaten
- 4 bird eyes chillies, chopped finely (optional)

How:
- Mix all ingredients together (except for egg). Add egg only as much as needed, to help the binding. This weekend, I only add about 2 tbsp of egg mixture, because the batter was pretty liquidy as is. Other time, I added the entire egg. It's just something you got to eye-ball.
- Heat oil in pan. Carefully drop spoonful of batter to hot oil. Fry until golden brown.

Pandan Crepe Filled with Sweet Coconut/ Dadar Pandan Kelapa Inti

I was contemplating dessert idea for our weekend party. It was humid hot day/night and we have a super delicious tub of ice-cream in the freezer and we thought, it'd be a nice touch to end the night. Then Vik started to mention cendol/es campur/ ice kacang (Indo/Malay cold drinks usually scented with pandan leaves). Long story short, I started to dig through pantry, decided to make klepon (pandan glutinous rice flour balls) - then ... here is the part when I will sound like a cheap host. Making klepon will involve 'sacrificing' my last bag of palm sugar cones I got from Indonesia. These (the palm sugar) are just not the same with those sold in stores here. Locally made and has distinct depth of flavor and taste. Yeah, I can get somewhat protective over special ingredients like this.

Should have picked up the cylinder shape Gula Aren (just another palm sugar stuff) from grocery store last week. So, next option on the list. It has to be dessert with pandan, cause I love the scent. Husband says 'Something that you can eat with ice-cream will be good, yes?' Though people rarely eat these pandan crepe with ice-cream, but it's possible and completely doable.

First response I got from guests was 'Eww..?? Green food?!' :) But really, who would say no the the earthy fresh smell of pandan and rich creamy sweetness of shredded coconut flakes simmered in palm sugar? We had one leftover and Vik ate it next morning.

What:
For the crepe:
- 200 gr all purpose flour
- 1 egg, lightly beaten
- 1 tbsp of sugar
- pinch of salt
- 300 ml coconut milk
- 2 drops of pandan extract or about 25 ml of fresh juice/extract
(I use bottled extract but fresh pandan leaves' extract is completely fine; it's a preferred method actually. Chopped up the leaves, either run it through food processor with few tbsp of hot, or pound it with mortar and pestle, strain the extract)

For the filling:
- 1 pandan leaf, tied to a knot
- 3-4 cups shredded coconut
- 150 gr palm sugar (brown sugar is okay)
- 50 ml thin coconut milk (just thin out canned coconut milk with water. It's absolutely okay to skip the thinning part, it'll just make the filling creamier)
- 1/4 tsp ground cinnamon
- pinch of salt

How:
- Make the filling by mixing and cooking all the ingredients together. Stir, make sure flakes are well coated with palm sugar. Filling is done when there is almost no liquid left. Just slighly damp.
- Mix all the crepe ingredients together, whisk. I don't strain it, but my mom and grandmas do, to make sure there is no lumps and stuff.
- Heat a non-stick pan. When hot, pour about 1/4 cup of mixture to pan and tilt the pan so that the mixture coat/spread evenly on the pan. I usually mess up my first one (too thick, not even, too thin, too this or that), but once you get a grip of it (the tilting and such), it's super easy.
- When crepe is set, put about two tbsp of filling to the center, and fold it to a roll shape.

Note: There are couple ways of finishing this up. Make all the crepe and stack them up. Then fill/stuff them all at once. Or, as the crepe sets (still on the pan), fill, and fold. I am accustomed to the latter, so that's what I did. There is also no need of extra oil/butter to the non-stick pan, (it IS afterall a non-stick pan) but also the coconut milk in the crepe batter has enough fat/oil content in it that the crepe should just slide out very easily.

The recipe yields 16. It could have been 20, there was some batter left. But I guess I was over zealous in piling up the stuffing :)

Friday, August 15, 2008

Indonesian Street Fares

Sooo..I am known with my random excuses for throwing a party. This weekend, Indonesia's Independence day on the 17th - friends get together is in order. On top of that, we bought a bright orange pendant light, Canada finally won few medals (AFTER Indonesia won theirs!!), scored a nice work gig, our very good friend just found out that she is pregnant - see...all these events worth celebrating, yes?

We had lontong & sate kacang (rice rolls and satay with peanut sauce), kroket (croquettes), lemper (sticky rice with chicken floss), risoles (risole), perkedel jagung (corn fritters) and the cold rolls. Dessert was dadar pandan isi inti kelapa (pandan crepe filled with shredded coconut). Recipes will follow, one at a time. Or I'd feel as if I am reliving the food again - and I am still stuffed from last night!

Anyway, the menu is pretty much street hawkers 'traditional' food (for the exception of Vietnamese rolls, it was made by special request); food easily found on stalls along the road or push cart on the street. Eat there standing or sitting on the bench. Or, take home in banana leaves (lined with newspaper or brown waxed paper), or tiny clear plastic bag. Park the car, roll down the window, call out the order. Else, you would hear familiar sounds outside the comfort of home (sounds made out from hitting stick to bowl, bell, spatula to pot, or as simple as the name of food being shout out loud by the vendors 'SATE SATE'), which then involves running out from house in flipflops, wave frantically signaling the person. Mmmhhmmhhmmhh.


To keep the theme, everybody had to eat on banana leaves (placed over plate). They got a kick of it and less soaking, scrubbing dishes for me - just quick rinse!! (Lazy host that I am!). I was tempted to go all out and just do it 'pincuk' style - banana leaves made into a somewhat lope sided cone shape, secured with toothpick on one side. Eat it by holding the boat on your palm. Utensils? Pair of sate skewers. Vik was terrified. White sofa, white table, white rugs, white chairs. :)

Tuesday, August 12, 2008

'Steamed' Chicken Rice


This is my 'fake' but 'fool proof' chicken steamed rice dish that even my mom started to fix in her own kitchen. I seriously believe that she secretly adore all these shortcuts-modified recipes. She just doesn't want to admit it!!

Nasi Ayam - Chicken Rice is usually consist of white rice (cooked and steamed in chicken fat *oh, yum*, ginger, etc, etc) topped with delicious tender chicken cuts on it. But basically, it's all white. Back in hometown though, this 'not-white' version is just another stepchild of Chicken Rice.

In Malaysia, from what I've seen, it shares some resemblance to their ClayPot Chicken Rice. But anyhoo, the beauty of S.E.Asia living/ culinary is that everybody sort of have their own version of something. This recipe here is a spin-off duplicate of the one that I LOVE from my hometown. Street-hawker style. The texture of the rice is somewhere between the usual steamed rice and glutinous rice, sans its stickiness. Very fragrant and hearty.

I don't have a slight clue nor nosy enough to ask the vendor dude (which I usually do) about the process of making this particular chicken rice. But my grandma is forever known with her chicken rice. So, I did learn/ watch the other type (white ones) of chicken rice being prepared. The cooking method for the chicken itself is tedious as it is. Then, come the rice. Parboil the rice to certain way, then continue the cooking process by steaming it.

I adore the art of cooking and wholeheartedly believe that the old way of cooking is an art itself - one can be easily lost if not preserved. The thought, the labor involved - of love, of time, of earnest. So yes, though I diligently jot down step to step on how to fix chicken rice at its most authentic (at least, I think it is) and traditional way, I simply just do not have the patience nor the time. Like most of us these days.

I have a feeling that I will have to come back with new post one day for better measurement. To get the right consistency of this chicken rice - it takes some experiment. Also, different rice brands and origins, seem to have their own character. I use Thai Jasmine Rice - even that, there are dozens different brands out there. I think (?) there is somesort of unwritten rule about not peeking on your rice while cooking it. But, hah, in this recipe, peek and stir anytime - I lift the lid at least three time to make sure it gets to the right texture.

Also, I tend to use wings for this recipe - it just makes the rice so flavorful. With very minimal food science knowledge under my sleeve, I still believe (want to believe) there must be some serious explanation of why wings are better in this dish!! All the skins' flavor melting to the dish?! Or, simply some quirky personal taste that I developed along the years.

What:
- 1 1/2 cup rice
- 1 cup chicken broth (as start, then I added another 1/4 cup as it cooks)
- 4 whole wings (separate the wings, drummettes and tips - give them good whacked, basically cracking the bones)
- 3 tsp of grated ginger (depends on personal taste)
- 4 cloves of garlic (again, we love garlic)
- 6 dried chillies (optional, soak in water and let plumped)
- 4 dried chinese mushroom, soaked and chopped coarsely
- 8 button mushrooms, chopped coarsely
- pinch of sugar or, my preference, sweet soy sauce
- pinch of black pepper
- 2 tbsp oyster sauce
- 1 tbsp hoisin sauce
- 2 tbsp soy sauce
- 2 tbsp sesame oil
- green onions, for garnish

How:
- Heat pot with 2 tsp vegetable oil. Toss in ginger, garlic and chilies. Stir.
- Add in mushrooms. Stir. Add oyster, hoisin, soy, pepper and 1 tbsp of sesame oil. Stir.
- Toss in wings. Cook for a little bit, let it brown on the outside.
- Add in rice. Mix it well with everything.
- Pour in the broth. It should just barely cover the rice (at this moment).
- Cover with lid - heat should be in medium. Check after about 10 minutes. (I actually stir and fluff it). Broth should be all soaked up by now. Pour in extra broth and the 1 tbsp sesame oil.
- Check again after 5 minutes. Turn off the heat and just let it rest for few minutes. Pick the wings out and shred. Discard the bones and return the meat to the pot. Stir. Note: Rice should not at all be lumpy and soft. Neither fluffy like Biryani rice. Sorry!! It's such vague description, will absolutely post better one next time.
- I like to mold the rice in bowl - just like the the street hawkers do it. Usually in some red bowl, fill it up, pat and even down the rice, plop it onto a plate. Oh, some fried onions on top!!! Ooohhh.


edited** Nasi Tim Ayam - that's the correct name for this dish, not just Nasi Ayam. Thanks to Mochacholata Rita. :)

Monday, August 11, 2008

Mussels in Garlic - Fermented Beans Sauce


Mussels is one of Vik's favorite dishes. This is also the only thing he actually knows how to cook. One time as he watched while I was preparing and fixing mussels (with simple sauce of wine and herbs) - he triumphantly declared that he'd be the one making mussels from then on. No kidding. He did proudly invite friends over to taste his 'fine cooking'!!!

Somehow I have an impression of many people are unsure about cooking mussels on their own, an intimidating cooking ingredient, perhaps? But let's just say if my husband can do it, anybody else can! :) Terrific athlete, technology savvy, but he is a complete loss when it comes to kitchen and home-improvement projects.

Few quick important notes though, if the shells are already open (before cooking it) - toss it away. It's dead! :) Make sure the shells are clean, run it under cold water, rinse, and sometimes light scrub is needed to remove the beards. When cooking process is done and some shells remain closed, discard these mussels.

What:
- 3 lbs mussels
- 5 cloves garlic (we like it very garlicky, use less to get milder taste/smell), chopped coarsely
- 3 shallots, chopped coarsely
- 1/2 spanish onions, cut to rings
- 2 tsp crushed red pepper (optional)
- 2 stalk green onions, chopped coarsely
- 2 tbsp fermented black beans
- 1 bay leaf
- few dash of chinese cooking wine
- salt and pepper
- 3 cup of broth (water is fine too, but I like to use either low sodium broth or coconut juice)

How:
- Heat 2 tbsp butter (oil is fine too) in wok/ pot. Toss in garlic, shallots, onions, red pepper, bay leaft. Stir and cook until onions are translucent.
- Add in black beans. Stir. Salt and pepper.
- Toss in mussels. Stir and mix mussels with everything else thoroughly. Stir in green onions.
- Pour broth and cooking wine in. Cover wok/pot tightly.
- Mussels are cooked when they are popped open.

When cooking it Asian style - we eat it with steamed rice. Otherwise (beer, wine, tomato sauce/marinara, and such), scooped up the broth/ sauce with good French bread. Yum yum!!

Sunday, August 10, 2008

Beef with Lemon Grass


I have this one lonely stalk of lemon grass in my fridge. The thought of making some fruit juice and use the stalk as stirring stick came to my mind. When I visited Indonesia after haven't been for so long, the first place my aunt took me was this Balinese Restaurant and when the drinks came out, each glass had this gigantic lemon grass stalk in the glass (which is very small compared to the stalk, really). Seen celery stalk, umbrella stick, what not, but never lemongrass stalk! I was skeptical on its functionality until I took a sip of the juice and it has a very faint refreshing lemon grass taste to it.

Anyway, I only have bananas and dragonfruit in my kitchen. So, no fruit juice. That was just me daydreaming of cool refreshing tropical juice! ;) This beef dish is really super easy. I don't marinate the beef for very long; being it so thinly sliced.

What:
- 1 lbs flank steak, cut thinly across the grain
- 1 stalk lemon grass, thinly slice the roots part, tough stalk removed
- 2 cloves garlic, minced
- 1/2 inch ginger, grated
- 1/2 small onion, cut to thick slices
- 1/4 cup nuoc nam (fish sauce)
- 2 tbsp lime juice
- 8 dried chillies (soaked and once plumped up, cut to half - optional)
- 1 tbsp palm sugar
- 2 tbsp soy sauce
- splash of water
- dash of black pepper

How:
- Toss together beef, black pepper, lime juice and some of the grated garlic. I just let it stand for about 20 minutes.
- Heat wok with 1 tbsp oil. Toss in garlic, ginger, onion and chillies. Stir until onions are translucent.
- Put wok into medium high heat. Toss in beef, stir quickly. When beef is halfway cooked (about 2 minutes), low the heat to medium.
- Add the rest of ingredients. Let it come to quick boil (beef should be cooked by then).
Note: The way I make it has very watery thin gravy; for thicker gravy, just mix small amount of cornstarch with water, add it at the end, and let it come to quick boil.

Thursday, August 07, 2008

Chicken and Shrimp Pad Thai


I love noodles dishes. I guess being Asian, it's hard not to love noodles. Our bread and butter, yes? At first, Vik was not much into noodles - once in a while, but not at all close to my sudden craving for wok-fried noodles. Until he visited Asia that is - Medan is the highlight, he literally could eat noodles for every meals. Yeap, the abundant varieties and they are just delicious ! Yum!.

Though I can make any noodles as often as I wish, it's just not the same. Largely, it is due to the wok and gas burner, or even better, coal type of stove (the name escapes me). My grandpa was super awesome when it comes to these type of wok frying: open fire, flames shooting up from the side of wok. Oh my! The beauty of having outdoor/ wet kitchen is Asia.

I've been to Thailand couple times but couldn't remember seeing Pad Thai - hawker style. Maybe I was too young, all I remembered was the fun festive night market. Upon conversation with this one gal, her description of hawker style Pad Thai in Thailand reminds me of wok fried noodles back in Medan. It should be on drier side - nothing too oily or gravy-iesh.

Most of the ingredients for making Pad Thai are staple in my kitchen - fish sauce, tamarind, rice stick noodles, sprouts. Except for tofu. Vik is not big fans of tofu - unless I 'hide' it somewhere in the dish. I LOVE TOFU. So, coming home from work, I grabbed a pack of extra firm tofu from store.

There are couple techniques on how to go about frying/cooking up Pad Thai. The dump and fry all of them sorta way - typical hawker style, I think. They don't have the time to do things in batches, do they. Or, cooking it in batches - fry up tofu, prepare scrambled eggs first.

I learn that, eggs part is always tricky when one has smaller work. Adding eggs at the end (which that's how it should be done), while using smaller wok, risking the noodle getting covered/ sticky goey with eggs mixture. Cause there is not enough working space in wok to work up/scramble the eggs before mixing it with noodles. Some people may like slightly egg-coated noodles, but .... hm....

So, might as well prepare the eggs part first (if using smaller work), and set it aside and add it at the end of cooking process. My wok is about 15" and at that, I am just fixing it up for two people, so I just dump and fry. :)

What:
- 250 gram rice stick noodles (soak or slightly cook according to package, it should be slightly hard and not thoroughly cooked) - I also use thinner version of rice stick, instead of the flat thicker version served in most places. Just because that's all I have in the pantry.
- tofu, cut to squares
- handful of shrimps, shelled and deveined
- 1/2 chicken breast, slice
- 2 cloves garlic, minced
- 2 shallots, minced
- 1/4 cup fish sauce
- 3 tbsp tamarind juice (either from canned juice or soak tamarind in hot water)
- 1 tbsp lime juice
- 4 tbsp palm sugar
- 2 tbsp sambal ulek (or sriracha hot sauce, optional)
- 2 tbsp crushed red pepper flakes (optional - we love ours very spicy hot, so adjust to taste)
- 2 stalk green onions (or chives) chopped to 1 inch lengths.
- 1-2 handful of fresh bean sprouts
- cupful of broccolis (optional, I just happen to have 1 small crown of it in fridge) chopped up to its florets
- crushed peanuts

How:
- Mix together fish sauce, tamarind juice, lime juice, palm sugar, sambal ulek together. Set aside.
- Heat 2 tbsp of oil in the wok. Make sure it's hot before tossing in cut up tofu. Fry until golden. Push to the side of wok. Toss in shallots, garlic and crushed red pepper. Stir.
- Add chicken. When chicken is half cooked, splash some water to wok and add in noodles. Stir.
- Add in the liquid mixture to wok. Stir and mix thoroughly.
- Toss in broccolis and green onions. Stir.
- Push noodles to the side of wok and add shrimps to center of of wok.
- When shrimps are almost cooked, mix noodles to shrimp. Toss together.
- Last, make a well (or push noodles to the side) and add whipped up eggs to center of wok. Let it set for a while, then scramble it. It is matter of preference here, I like the eggs on chunkier side, so I let it set first before 'separating' it out. For smaller 'crumblier' egg bits, scramble it right away.
- Serve with crushed peanuts on top (and some coriander - I don't have any of them at the moment)


Tuesday, August 05, 2008

Oven Baked Spicy Chicken


Another lazy easy recipe. Literally cut everything up, dash of this and that, wrapped in foil, and bake. It's a 'no work, no pain' version of grilled Indonesian chicken with spiced sweet soy. I like to make dinner like this when work is piling, yet I still want to make home-cooked meal, without having to spend too much time preparing. It's comforting, sliding the pan to the oven, leave it in there while taking a shower or finish up some chores or catching up with the husband - and when the aroma starts to creep out from the oven; just heavenly.

What:
- Chicken (I use 4 thighs but any mix is fine), seasoned with pepper and salt
- 2 small tomatoes, quatered
- 1 onions, quartered
- 2 cloves garlic, chopped coarsely
- 3 shallots, chopped coarsely
- 2 bird eyes chillies, slit or chopped coarsely
- 2 tsp sambal ulek (optional)
- 1/4 cup sweet soy sauce
- 2 tsp soy sauce
- 1 tsp sweet paprika
- dash of fish sauce (shrimp paste if possible)
- pineapple chunks (optional, I just have some pineapple in fridge)

How:
- Mix everything (except chicken and pineapple).
- Make an aluminum foil pouch, or just use regular baking dish, put in chicken.
- Arrange pinapple chunks to the side of chicken.
- Pour spices/sauce on top of chicken. Wrap foil loosely. If using baking dish, wrap/tent with foil too.
- Bake in 350 degree oven. Time depends on size of chicken. Vik likes very soft, falling off the bone chicken, so I bake it for about 1 hour. The last 5 minute of cooking, open the foil pouch and put it under broil.
- Serve with hot jasmine rice and steamed vegetables Indonesian style. Mmmm!!!!

Friday, August 01, 2008

Siu Mai and Green Onion Pancake


Had a friend over to 'inspect' our balcony and to give me some ideas about so called urban garden. Beside my poor photography skill, my gardening skill is not that great either - when cactus dies on me, I know I am not cut for any gardening. But I do want some herbs and such, just not brave enough to start them.

Then we decided to have some afternoon snacks with minted cold iced tea. So after quick peek to fridge, she spotted a pack of dumplings wrappers that I just got day before and suggested some siumai. Once the package is opened, I found out how thick the wrap is. I tend to pick up different brand once in a while, just to test it out and this time is maybe the thickest one ever. My mom or grandma would say something like 'You could have just made it from scracth and be consistent in its thickness.' If only.

So we were doing some prep work, dragging my stools so I can reach to the top shelf of my kitchen cabinet - only to realize I don't have my bamboo steamer. Used it as container/serving dish for pot luck dinner few months ago and it's still at friend's house. So, thick dumpling skins and no steamer. We then opted to pan-fry it like gyoza.

To pair it up, thin onion pancake (crepe) filled with carmelized onions and mushrooms.

Siu Mai
- 10 wrappers
- 5 shrimps, chopped coarsely
- 5 shrimps, minced
- 1/4 cup ground chicken (or pork)
- 2 shiitake mushroom, finely chopped
- dash of chinese cooking wine
- dash of sesame oil
- pinch of five spice powder
- 1 garlic, minced
- garlic, grated
- soy sauce
- 1/4 tsp of rice flour/ corn starch
- carrots, diced to tiny cubes.

How:
- Mix all ingredients together in a bowl (except wrappers and carrots).
- Make a very loose fist of left hand (as in making a letter C), place one wrapper on top of fist, over the hollow part. Push wrapper down a little bit to fit the hollow of fist.
- Put 1 tbs of filling onto it. Slowly (or quickly) shape it to sio may shape, with the help of spoon on top to pack it down. Top it with carrot cube.
- Traditionally, steam it in bamboo steamer, with layer of napa cabbage underneath it. But we have to pan fry it, by putting a touch of oil to the pan, once the bottom part is browned, pour a little bit water to the pan. Cover. It will steam through very quickly, 10 minutes top.

I wish I could describe better on shaping these open top basket like dumplings. Maybe, I should draw them up? Hmm. We sort of forgot about the siu may while it was pan fried, by the time we lift the lid to pour the water, the bottom side of the dumplings started to brown towards super crispy almost burn stage. It doesn't prevent us from chowing all ten of them down.


Green onion pancake/ crepe - was decided at last minute. Basically just rice flour, water, chopped up green onions, salt and pepper, whisk. It resembles thinner version of breakfast pancake batter, like crepe batter. Heat up some oil, pour pancake batter, tilt the pan so batter coat the pan nicely. Only flip when one side starts having golden brown specks. We fill it with caramelized sweet onions and mushroom.

Mix up a quick dipping sauce: hot sauce, touch of chili oil, hoisin and sesame oil.

Spinach Pinwheel

Beside the thick dumplings skin in the fridge, there is also a thawing box of puff pastry that I was planning to use for making quick breakfast 'danish' the next day. Just slap some preserves on it or chopped ham and eggs filling. Yum! But well, we ended up using it as another addition to our siomai and green onions crepe duo.

What:
- 1 sheet of store bought puff pastry (10x10)
- 1/2 box of frozen spinach, thawed and squeeze all the water out
- pinch of nutmeg
- 1/2 cup sharp cheddar, grated
- 3-4 basil, cut into confetti
- 1/4 cup of parmesan
- red pepper flakes
- 1/4 cup of sour cream (optional)
- 1 egg beaten
- sweet paprika

How:
- Mix spinach, nutmeg, cheddar, parmesan, basil, red pepper flakes, sour cream and 1/2 portion of beaten egg, stir well.
- Lay pastry on parchment paper, spread filling on top of pastry. Roll. Wrap rolled pastry with parchment paper. Slide it back to freezer for about 10 minutes.
- Take pastry out, cut into 1" thick pinwheel. Place on baking sheet (wheel side up), brush with eggwash and sprinkle with sweet paprika.
- Bake in 350 degree oven for about 20 minutes or golden brown.